Welcome to the (hopefully) long-awaited sequel to my previous post.
As the title suggests, this post will be a breakdown of how I got videos to play on my terminal.
Let's go.
My Initial Approach
Following the success of printing images to the terminal, I decided to repeat the process with video files. After all, they're just a "sequence of images", right?
I was wrong. I was very wrong.
I feel the need to admit the fact that video files are more complex than I initially thought them to be.
As a result, a huge part of my time on this project was spent just trying to understand the specifications of an MP4 file. Try your luck. Hopefully you get further than I did.
I expected to find some chunk of bytes that directly translated to each frame in a video, which I would then take and decode in a loop.
What I found instead, was a file structure that just confused the hell out of me.
A Brief Video File Lesson
From my potentially traumatic research into video files, I learnt that they're split up into two parts
Codec
The standard used to encode and decode the data that's stored in the file. Various codecs exist for video and audio data seperately. When this data is encoded, it needs to be stored somewhere so it can be extracted and decoded for playback or editing.
Container
The structure that stores all the pieces of data contained in a video file. This is what is actually being referred to when we mention a video file's format/extension. MP4, MOV, MKV, and others, are just different container types that are perfectly capable of storing data that has been encoded with various codecs. But, of course, some formats are designed to only store data that's encoded with specific codecs. Monopoly and all that.
If you're confused, don't worry, so am I. This video clears things up a bit. I had to rewatch it a few times though.
My Attempt At Decoding Video Data
Following the document I linked earlier, I tried really hard to just extract the video stream and be on my way. I focused on MP4 files because of how common they are.
MP4 containers store their data in the form of boxes/atoms. These boxes are split into size, name and data. Using this information, alongside a lot of reading, I managed to put together a little script to list all the boxes in an MP4 file.
video = "videoplayback.mp4"

with open(video, 'rb') as f:
    size = 0
    index = 1

    while True:
        box_size = int.from_bytes(f.read(4))
        box_name = f.read(4).decode('ascii')

        if box_name.strip() == "":
            break

        print(f"Box name: {box_name}")

        f.seek(box_size + size)

        size += box_size
        index += 1
From here, it was an uphill battle. The constant back-and-forth between my code and the specification document slowly made it very apparent to me that this was not something I wanted to embark on. Not now, at least.
The reason is quite simple: The parsing process is too damn stressful.
After the fifth day in a row of coming back home and trying to understand the structure so I could get closer to the video data somehow, I realized I wasn't built for this.
I'm sure that, with a lot of time, I would've found those video frame bytes somewhere if I kept looking, but I was so tired of staring at that file that I quickly started to look for alternatives.
Thankfully, I didn't have to look for long.
FFmpeg, again
Unlike with the image project, I had no reservations about using FFmpeg this time. After all, it's already a dependency in the program, so it only makes sense to take full advantage of it. Especially in this time of need.
The idea was to use FFmpeg to split up a video into a bunch of image frames, which I could then parse by hand. I managed to string two commands together to achieve this.
The first command takes a video, splits it up into image data and sends the data out as an output stream:
ffmpeg -i <video_file_path> -f image2pipe -vcodec bmp -
The second command takes in a stream of image data and saves it to an image file that's been scaled to certain dimensions:
ffmpeg -y -f image2pipe -vcodec bmp -i - -vf "scale=<width>:<height>" frame%04d.bmp
I decided to use the bmp image file format since I already had some experience with parsing it.
The full command pipes the output of the first into the input of the second:
ffmpeg -i <video_file_path> -f image2pipe -vcodec bmp - | ffmpeg -y -f image2pipe -vcodec bmp -i - -vf "scale=<width>:<height>" frame%04d.bmp
After ensuring the command worked as expected, I started to write the code for video processing, starting with executing the command in Python. I made sure to save the generated frames to a folder with the same name as the video file, just to make things easier to track.
import os
import subprocess
import time
import threading

file_name = "videoplayback.mp4"
dirname = os.path.splitext(file_name)[0]
print_char = '█'

def create_video_frames_dir():
    try:
        os.mkdir(dirname)
    except FileExistsError:
        pass

def generate_video_frames():
    cols, rows = os.get_terminal_size()
    create_video_frames_dir()

    subprocess.run(
        [
            "ffmpeg",
            "-i", path,
            "-f", "image2pipe",
            "-vcodec", "bmp",
            "-",
            "|",
            "ffmpeg",
            "-y",
            "-f", "image2pipe",
            "-vcodec", "bmp",
            "-i", "-",
            "-vf", f"scale={cols}:{rows}",
            os.path.join(dirname, "frame%04d.bmp")
        ],
        shell=True,
        stdout=subprocess.DEVNULL,
        stderr=subprocess.STDOUT
    )
After storing the frames to a folder, I would need to fetch them from that folder and print them to the screen. I didn't want to have to wait for all the frames to be created before doing this though, since that would just be a waste of time. So, I wrote this functionality with the intention of fetching frames while they were being generated.
def delete_video_frame(frame):
    frame_path = os.path.join(dirname, frame)
    os.remove(frame_path)

def clear_terminal():
    if os.name == 'nt':
        os.system('cls')
    else:
        os.system('clear')

def _print(frame):
    frame_path = os.path.join(dirname, frame)
    with open(frame_path, 'rb') as f:
        # BMP file header
        f.seek(10)
        video_start = int.from_bytes(f.read(4), 'little')

        # DIB header section
        f.seek(18)
        width = int.from_bytes(f.read(4), 'little')
        height = int.from_bytes(f.read(4), 'little')
        f.seek(28)
        bits_per_pixel = int.from_bytes(f.read(2), 'little')

        # Calculate row size and padding
        row_size = ((bits_per_pixel * width + 31) // 32) * 4

        for y in range(height - 1, -1, -1):
            # Move file pointer to the start of the current row
            f.seek(video_start + y * row_size)

            for _ in range(width):
                # Little endian means that RGB is now BGR
                blue = int.from_bytes(f.read(1), 'little')
                green = int.from_bytes(f.read(1), 'little')
                red = int.from_bytes(f.read(1), 'little')

                print(f"\u001B[38;2;{red};{green};{blue}m", end='')
                print(print_char, end='')
                print("\u001B[0m", end='')

            print()

    clear_terminal()

def print_frames():
    retries = 0

    while True:
        frames = os.listdir(dirname)

        # If no new frames are being generated, end program
        if len(frames) == 0:
            time.sleep(1)

            retries += 1
            if retries == 3:
                exit()

            continue

        # Prints all available frames before fetching more
        while len(frames) != 0:
            _print(frames[0])
            delete_video_frame(frames[0])
            frames.pop(0)
The _print function uses the exact same code I wrote to parse and print bmp image files in the previous post.
With the main parts of the program finished, all I had to do was run it correctly. I decided to use multithreading to run the functions in parallel instead of in sequence.
if __name__ == '__main__':
    frame_generation = threading.Thread(target=generate_video_frames)
    frame_display = threading.Thread(target=print_frames)

    frame_generation.start()
    time.sleep(0.5) # Giving it some time to generate a few images (I'm so kind)
    frame_display.start()
After running this, I got the following result:
Hehe. Got you.
I was happy to get a video "playing". But, that's the thing. The video was "playing", not playing.
This takes me to the next part of this project.
Optimizations
There was a lot to improve, so I started with the most obvious.
Optimization #1 - Getting rid of the flickering
My limited knowledge of rendering led me to believe that the flickering was unavoidable because an image had to be drawn for each frame.
What I didn't know was that the above statement was only partially true. Yes, the frames have to be drawn in sequence so you can get that feeling of a moving video. But, there are more efficient ways of drawing frames in quick succession. The solution I ended up with used a mixture of two techniques I found online.
Double Buffering
This was surprisingly simple to understand. It refers to saving all individual data to a buffer, and using the whole buffer at once, instead of using each piece of data at a time.
To achieve this in my program, I updated the _print function to store all the pixels into a string, and printed out the string in one operation.
def _print(frame):
    frame_path = os.path.join(dirname, frame)
    with open(frame_path, 'rb') as f:
        # BMP file parsing...

        output = ""
        for y in range(height - 1, -1, -1):
            # Move file pointer to the start of the current row
            f.seek(video_start + y * row_size)

            for _ in range(width):
                # Little endian means that RGB is now BGR
                blue = int.from_bytes(f.read(1), 'little')
                green = int.from_bytes(f.read(1), 'little')
                red = int.from_bytes(f.read(1), 'little')

                # Double Buffering: Saves all the data to a variable,
                # which is then printed to the screen in one action
                output += f"\u001B[38;2;{red};{green};{blue}m"
                output += print_char
                output += "\u001B[0m"

            output += "\n"

        print(output)

    clear_terminal()
This resulted in faster drawing times for each frame, which was a huge plus in my book.
It's not perfect though, since it leads to lag on larger terminal sizes due to all the pixels having to be stored before any can be printed out. But it was good enough for me.
Resetting the cursor to the start of the frame
This. This was the real game changer.
The idea here is so wonderful that I didn't believe it was even legal. Felt too good to be true.
Basically, instead of clearing the entire terminal and printing out a new frame, you instead use an ANSI escape code to, this is the magical part, set the cursor to the start of the old frame.
This does two things:
- Allows you to overwrite the old frame data.
- Removes the need for clearing the screen.
So you get a video frame that's updated instanteneously, and in the same place. No scrolling. No screen clearing. No flickering.
This is the ANSI code to set the cursor to the top-left of the screen: \033[H
I updated my code to include this.
def _print(frame):
    # Everything else stays the same...

    # Moves cursor back to top of display buffer, to allow for overwriting of written data
    # instead of clearing the entire terminal
    print("\033[H", end="")
The results of using these two techniques in the code are, for lack of a better word, glorious:
Optimization #2 - Streaming video data into the program
I'm sure your eyes almost popped out of your head when you saw this line somewhere above:
I made sure to save the generated frames to a folder with the same name as the video file, just to make things easier to track.
No? Really? What about this line then:
I decided to use multithreading to run the functions in parallel instead of in sequence.
I'm sure this caused some headaches.
In any case, I was well aware of the inefficient approaches depicted in those statements. Since I had succeeded in creating a working video player, there was no need to keep them in there. So my next optimization was streaming the generated frames directly into the program for immediate use.
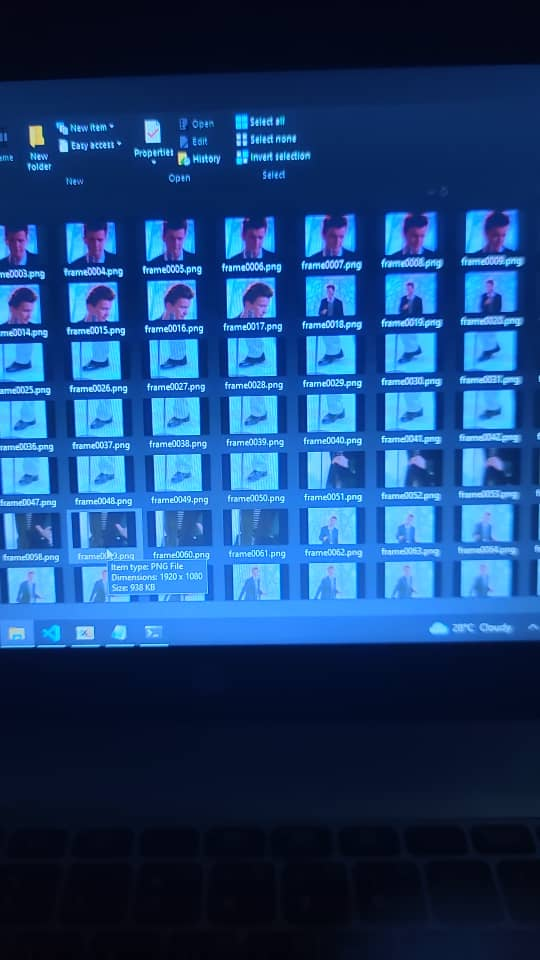
We don't need the folder
The folder served as a store for the generated video frames. But there were two issues with this:
- Saving generated images adds a lot of overhead to the program, leading to slow/laggy video playback.
- The folders got big. Fast.
The image below shows just the beginning frames of the video being played. The number frames being stored increases as the program runs, until all frames have been generated and the program can consume them at a steady rate.
The solution here was to delete the second half of the frame generation command. I renamed the generate_video_frames function to process_video_frames, just for consistency.
def process_video_frames():
    cols, rows = os.get_terminal_size()

    command = [
        "ffmpeg",
        "-i", path,
        "-f", "image2pipe",
        "-vcodec", "bmp",
        "-vf", f"scale={cols}:{rows}",
        "-"
    ]

    subprocess.run(
        command,
        shell=True,
        stdout=subprocess.DEVNULL,
        stderr=subprocess.STDOUT
    )
Now, the program generates frames and sends them as an output stream. But, how are we gonna use it?
Accepting video frame streams
This part was daunting, but I wouldn't be writing this blog post if I didn't figure it out, so let's get into it.
The first step was to point the output stream to a handler that I could access from my code. This would mean setting the stdout argument to the subprocess.PIPE object. I then had to save the running process into a variable I could access.
def process_video_frames():
    cols, rows = os.get_terminal_size()

    command = [
        "ffmpeg",
        "-i", path,
        "-f", "image2pipe",
        "-vcodec", "bmp",
        "-vf", f"scale={cols}:{rows}",
        "-"
    ]

    process = subprocess.Popen(
        command,
        stdout=subprocess.PIPE,
        stderr=subprocess.DEVNULL
    )
Next, I had to read the command's output in a loop until it had no more frames to give me, after which I could clear the terminal and exit the program. My knowledge of bmp format parsing came in handy here.
def process_video_frames():
    # Everything stays the same...

    while True:
        header = process.stdout.read(14)
        if not header or len(header) < 14:
            break

        size = int.from_bytes(header[2:6], 'little')
        frame = header + process.stdout.read(size - 14)

        _print(frame)

    clear_terminal()
    exit()
From here, I had to rewrite my _print function to read from a stream instead of reading bytes from a file. The io library helped a lot with this.
def _print(frame):
    f = io.BytesIO(frame)

    # Everything else stays the same...
And... that was it. I had successfully removed the need for video frame storage, and optimized my program to directly process the streamed video data instead.
As a plus, I didn't even have to use multithreading anymore, since the program could now process all the frames in a single thread.
if __name__ == '__main__':
    process_video_frames()
This resulted in faster video playback, with almost no lag. Sometimes, its too fast though. I haven't adjusted it to play in sync with the video's original framerate yet, lmao.
I would show you, but I think it's better if you try it out yourself.
You can get it from here. Forgive the terrible name.
Oh yeah, as a bonus, I got it to play Bad Apple :)
I'm working on adding support for video calls. Yeah, in the terminal. That'll probably be another blog post.
That's all for now. Until next time, thanks for reading!